How to Scope a Software Project: Timeline, Budget & Effort Estimation
Research from McKinsey and the Standish Group consistently shows that large software projects run over budget by an average of 45 — 52%. The most common root cause is not bad engineering — it’s a scope that was never properly defined before the first line of code was written. Scoping is the single step that separates projects that deliver on time and on budget from ones that quietly triple in cost. This guide walks you through the full process: from a fuzzy idea to a scoped brief your development team can actually price.
What “Scoping” Actually Means (And Why It’s Not a Requirements Doc)
Scoping and writing a requirements document are often conflated, but they solve different problems at different stages. Scoping is an upstream activity: you’re answering “what are we building, roughly how big is it, and is it feasible?” A software requirements document (SRS) is downstream: it specifies in precise detail how the system should behave once scope is agreed.
Think of scoping as the feasibility and sizing pass. A scoping exercise for a mid-complexity product (10 – 30 features) typically takes 2 – 4 weeks. Simple apps with fewer than 10 features can be scoped in a few days. Enterprise platforms with legacy integrations may take 6 – 8 weeks. Rushing this step is the single most reliable predictor of budget overruns.
Step 1 — Define the Problem You’re Solving, Not the Solution
Most founders arrive at scoping sessions with a list of features. The first job is to step back and write a one-sentence problem statement before touching features at all:
“We’re building [X] so that [user type] can [job to be done] instead of [current workaround].”
For example: “We’re building a booking platform so that independent yoga instructors can manage class schedules and collect payment online instead of using WhatsApp groups and manual bank transfers.”
This statement does three useful things: it identifies who the product is for, what outcome they need, and what they’re doing today instead. Any feature that doesn’t connect back to that sentence is a candidate for cutting. This prevents goldplating — the tendency to add “nice to have” complexity that inflates build time without proportional user value.
Step 2 — Map User Types and Their Core Jobs
Next, list every type of person who will interact with the system. For each user type, answer two questions: what can they do, and what are they explicitly prevented from doing? This shapes your feature list and access permissions simultaneously.
- Instructor — creates classes, sets prices, views bookings, processes refunds
- Student — browses classes, books a slot, pays, cancels within policy
- Admin — manages all instructors, views platform-wide revenue, handles disputes
Once you have user types, translate their needs into user stories: “As a [user type], I want to [action] so that [benefit].” User stories are not a spec — they’re a discovery tool that surfaces features you hadn’t considered and flags permissions that need engineering decisions.
Step 3 — Prioritize Features With the MoSCoW Method
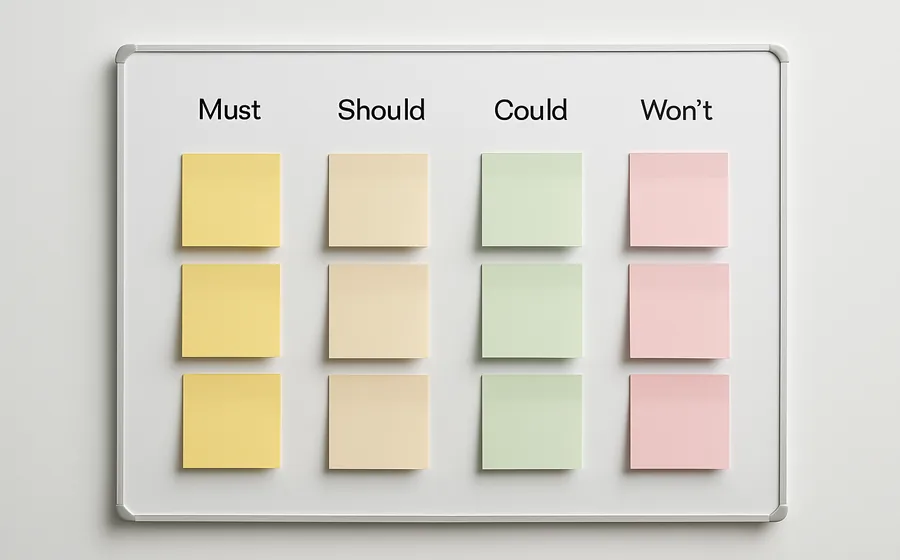
With a list of potential features in hand, the next step is ruthless prioritization. The MoSCoW method — Must Have, Should Have, Could Have, Won’t Have — gives you a structured way to separate launch-critical work from everything else.
| Category | What it means | Example feature (booking app) |
|---|---|---|
| Must Have | Launch-blockers. Without these, the product cannot function. | Class creation, student booking, payment processing |
| Should Have | Important but not day-one. Absence is painful, not fatal. | Automated reminder emails, calendar sync export |
| Could Have | Nice to have. Add if time and budget allow. | Waitlist management, referral program |
| Won’t Have | Explicitly out of scope for this build. Document it. | Native mobile apps, multi-language support, video streaming |
The Won’t Have column is the most underused and most valuable. Writing it down eliminates the “while you’re at it” requests that arrive mid-build and blow up timelines. Your Must Have list is effectively your MVP scope — if you want to understand how to build an MVP that ship quickly, the MoSCoW Must Have column is where that work starts.
Step 4 — Identify Integrations and Third-Party Dependencies
Every integration with an external service adds scope and risk. Common ones that projects underestimate:
- Payment gateways (Stripe, PayPal, Adyen) — PCI compliance, webhook handling, refund flows
- Authentication providers (Auth0, Firebase, Google OAuth) — session management, social login, MFA
- CRM or ERP connections — data mapping, sync frequency, error handling
- Email and notification infrastructure — transactional email (SendGrid, Postmark), push notifications
- Analytics and tracking — event schemas, consent management
As a rule of thumb, each integration adds roughly 15 – 30% to that feature’s timeline estimate once you account for API documentation review, sandbox testing, error-state handling, and production credentials. Before committing an integration to scope, always ask: is a stable public API available, or will you need to build a custom connector? The second path is three to five times slower.
Common blind spot: admin panels, internal reporting dashboards, and email notification systems are often treated as “small” but routinely account for 20 – 30% of total build time. Add them explicitly to your feature list.
Step 5 — Estimate Effort (The Right Way)
T-Shirt Sizing vs Story Points
At the scoping stage, precision is the enemy. You don’t have enough information for hour-by-hour estimates, and the false precision misleads stakeholders. Instead, use T-shirt sizing: label each feature S, M, L, or XL based on relative complexity.
| Size | Rough effort | Example |
|---|---|---|
| S | ~8 hours (1 day) | Static informational page, simple form |
| M | ~24 hours (3 days) | User profile with edit/avatar, email notifications |
| L | ~80 hours (2 weeks) | Booking flow with calendar UI + payment integration |
| XL | ~200 hours (5 weeks) | Admin dashboard with multi-tenant reporting |
Story points come later, during sprint planning, when the team has enough detail to estimate individual tasks. A useful scoping rule: if a feature would take more than two working days to specify clearly, it’s probably an L or XL that needs to be broken into smaller pieces before estimating.
The Estimation Triangle: Scope × Time × Budget
Every project is constrained by three variables: scope (what you’re building), time (how long it takes), and budget (what it costs). Tighten one variable and at least one other must give. This is the triple constraint, and it governs every honest project estimate:
- Fixed scope → estimate time and cost (time-and-materials or fixed-price)
- Fixed budget → scope and timeline become negotiable
- Fixed deadline → scope must shrink or budget must grow
Understanding which variable is truly fixed in your project determines your contract model. If scope is well-defined and stable, a fixed-price or time-and-materials contract both work — with different risk allocations. If scope is still evolving, a fixed-price contract is a trap for both parties.
Step 6 — Translate Estimates Into a Budget Range
Once you have T-shirt sizes for all Must Have features, convert them to a budget range:
- Sum estimated hours across all Must Have features.
- Multiply by the blended hourly rate for your target region ($50 – $150/hr offshore; $150 – $250/hr nearshore or onshore).
- Add a 20 – 30% buffer for unknowns, onboarding, and QA cycles.
| Project type | Rough budget range | Key variables |
|---|---|---|
| Simple MVP (5 – 10 features) | $15,000 – $40,000 | Single user type, no complex integrations, offshore rate |
| Mid-complexity product (10 – 25 features) | $40,000 – $120,000 | 2 – 3 user types, 2 – 4 integrations, mixed team |
| Full product (25+ features) | $120,000 – $250,000+ | Enterprise integrations, multi-tenant, admin layer, compliance |
If the numbers feel uncertain, consider a paid Discovery Phase before committing to a full build. A discovery engagement — typically 2 – 4 weeks and $5,000 – $15,000 — produces a detailed scope document, architecture diagram, and accurate quote. It is almost always cheaper than fixing scope surprises mid-build.
When you’re ready to approach vendors, our guide on how to choose a software development company covers what to look for in a development partner’s process, pricing transparency, and communication cadence.
The Scope Creep Problem (And How to Stay in Scope)
Scope creep is the gradual expansion of a project beyond its original boundaries — usually without a corresponding change to timeline or budget. It is one of the leading causes of project failure, and it almost never arrives as a dramatic pivot. It comes in small asks: “Can we just add one more filter?” “While you’re in that screen, can you change the layout?” “The CEO would really like a mobile app version too.”
The three main culprits:
- Stakeholder additions — new requirements surfaced by people who weren’t in the original scoping sessions
- Unclear requirements — ambiguous features that get “interpreted” expansively during build
- “While you’re at it” requests — opportunistic additions that seem small but compound
The antidote is a formal change request process: any addition outside the agreed scope must be documented, estimated, and approved before work begins. A vendor who never pushes back on new features mid-build is not being accommodating — they’re running up a tab you’ll pay at the end. Good development partners treat scope changes as a discipline, not a service.
The freeCodeCamp scoping guide has a practical breakdown of how change logs work in practice during an active build cycle.
When Your Scope Doc Is Ready: What Comes Next
A completed scope document serves as the input for two downstream activities. First, it becomes the foundation for your formal software requirements document — the detailed specification that engineers work from. If you haven’t written one before, our guide on how to write a software requirements document picks up exactly where scoping leaves off.
Second, it becomes your RFP (request for proposal) when approaching vendors. A scoped brief with user types, a MoSCoW feature list, and known integrations allows development teams to return accurate, comparable quotes rather than ballpark estimates. If you’d like a development team to review your scope and return a fixed quote, custom software development specialists can walk you through a paid discovery phase before any code is written.
Your Scope Doc Checklist Before You Hire a Developer
Before sending your scope to a vendor, confirm you have:
- ☑ One-sentence problem statement identifying user type, job to be done, and current workaround
- ☑ All user types listed with their allowed and restricted actions
- ☑ Full feature list organized by MoSCoW category (Must / Should / Could / Won’t)
- ☑ All third-party integrations named with API availability confirmed
- ☑ T-shirt size estimates for all Must Have features
- ☑ Rough budget range with buffer calculated
- ☑ Won’t Have list documented and signed off by stakeholders
- ☑ Success criteria defined: how will you know the product is “done”?
Frequently Asked Questions
What is a project scope document in software development?
A project scope document defines what a software project will (and won’t) build — including features, user types, integrations, and success criteria. It’s the input for effort estimation and vendor quotes, and the reference point for managing scope creep during development.
How long does it take to scope a software project?
For a mid-complexity project (10 – 30 features), scoping typically takes 2 – 4 weeks. Simple apps (under 10 features) can be scoped in a few days; enterprise platforms with legacy integrations may take 6 – 8 weeks. Rushing this step is a leading cause of budget overruns.
What is scope creep and how do you prevent it?
Scope creep happens when features or requirements are added after the project has been estimated and agreed — without a corresponding change to timeline or budget. Prevent it by documenting a clear “Won’t Have” list in your MoSCoW matrix, requiring written change requests for any additions, and re-estimating before approving them.
Should I scope the full product or just the MVP?
Scope both — but estimate and fund only the MVP first. Scoping the full product vision helps you avoid architectural decisions that lock you out of future features; scoping the MVP keeps the first build affordable and fast to market. Treat the full-product scope as a living roadmap, not a build list.
How do I estimate the cost of a software project before talking to vendors?
Start with T-shirt sizing: label each feature S, M, L, or XL. Convert to rough hours (S ≈ 8h, M ≈ 24h, L ≈ 80h, XL ≈ 200h), sum them up, multiply by a blended hourly rate for your target region ($50 – $150/hr offshore, $150 – $250/hr nearshore/onshore), then add a 25% buffer. This gives you a budget range to validate when quotes come in.